
Wednesday, October 31, 2012
Happy Halloween
Tuesday, October 30, 2012
A Little Christmas Cheer

Monday, October 29, 2012
Joyful Creations

 Yesterday the scrap room overflowed with "JOY" into the family room. A total of 15 JOY Frames were created and as much as this was a Stampin' Up project, we were an advertisement for the Scotch Brand ATG tape dispensers! We had assorted ATGs: pink, red and yellow; 1/2" and 1/4" models. I started out with a red ATG a few years ago and couldn't get the hang of it. But a year or more after that a friend was singing the praises of her ATG so I gave mine another try. Right about that time, big box stores started selling the pink ATGs. I now have the red version for acid free tape (which I use in scrapbooking) and the pink for general purpose. Either tape can be used in either gun, but the color is my way of keeping track of acid free tape, which is more expensive. Someone asked where I purchased the 12x12 scrapbook/shadow box frames. Since I needed so many, I bought them online at Joanns. If you only need one or two, the big box stores do have them~~don't forget the 40% off or more coupon! Saturday is the next JOY workshop and should be another fun afternoon. Have a good week and don't forget the Spooktacular stamp sale is today only.
Saturday, October 27, 2012
Additional Single Stamps!
Just in time for the Stamp Spooktacular, SU has added more single stamps to the mix! Due to the interest in the single stamps promotion announced earlier this month, SU has added ten additional individual images, including three images not seen before. A few things to remember when ordering the single image stamps:
These won't be sent to you in our typical cases or packaging; they'll be
packaged in cello bags. If you'd like a case for your stamp, you can buy our
Clear-Mount Stamp Cases that come in packs of four (item 119105).
This offer is available for clear-mount stamps only.
The stamps won't come with a Clear-Mount Block, and you'll need to buy a
block separately if you don't already have one. The recommended block sizes can
be found on the flyers.
There's no limit on how many pieces you can buy.
Click on the links below to see the stamps and remember these stamps are also included in the 15% off one-day only sale on October 29th.
http://www.stampinup.com/us/documents/Single_Flyers_assorted_US.pdf
Click on the links below to see the stamps and remember these stamps are also included in the 15% off one-day only sale on October 29th.
http://www.stampinup.com/us/documents/Single_Flyers_assorted_US.pdf
http://www.stampinup.com/us/documents/Single_Flyers_assorted2_US.pdf
Have a great weekend and if you are celebrating Halloween with family and friends, party safely!
Have a great weekend and if you are celebrating Halloween with family and friends, party safely!
Friday, October 26, 2012
BOO!
 Happy Friday! A few weeks ago I was at Michael's and frames were on sale. A scrapbook frame caught my eye and even though I had no idea what I was going to use it for, I purchased it. Yesterday I was in my storage area, saw the frame and immediately thought "BOO" frame! It was very easy to create--thanks to my Cricut. I kept it rather simple, using Halloween pattern paper rather than a number of embellishments. The letters are from the Plantin Schoolbook cartridge and the spider and cat are from the Artiste cartridge. By the way, I did use Stampin' Up cardstock and eyes!!! Have a wonderful day.
Thursday, October 25, 2012
Stamp Spooktacular!!!!
Stampin' Up just announced that on Monday, October 29th ONLY, all stamp sets and single stamps in the main catalog will be on sale for 15% off!!! This DOES NOT include hostess sets, bundled stamp sets or digital stamp brush sets. Call or email me your order or you can place your order online at my website: www.stampintimesomewhere.staminup.net This sale will begin at 12:00 AM Mountain time and ends at 11:50 PM Mountain time. The discount does not apply to clearance rack items. For those of you who will be here on Sunday for the JOY Frame workshop, you can let me know then if there are any stamp sets you would like to order. I will post additional information a little later.
Leftovers (cont'd)

 Don't discard those leftover 1 1/4" squares of Snow Festival DSP you have! Put them all together and look at the cards you can create. Each card required twelve 1 1/4 inch squares. I have to say that the Top Note die is a favorite die and creating a Top Note quilt card is one of my favorite ways to use it. You do not have the Top Note die? No problem--glue the squares to a 3 3/4" by 5" piece of cardstock and adhere that to a card front. Or make the piece of cardstock a little larger (as I did), leaving a frame around the quilt pattern and then adhere to a card. These cards are as close to quilting as I will ever get. I have always admired the beauty of quilts. And when I see handmade quilts, I am in awe. The time, talent and precision that goes into every quilt amazes me and I applaud those who quilt and share their beautiful creations with others. Have a great day and find yourself a little stampin' or quiltin' time!
Wednesday, October 24, 2012
Snow Festival DSP Leftovers

 This weekend and next, the ladies who signed up for the JOY Frame class will be here to work on their projects. Most are making one JOY Frame but a few are making three or more. Since each person gets one-half of the pack of Snow Festival Designer Series Paper, each will have a nice selection of "leftovers" when their frames are completed. Today's post includes two cards I created using some of my leftovers. The sentiments on both cards are from the Petite Pairs stamp set. The font is very pretty and nicely fits in the Four Frames image on the Baja Breeze card. After stamping and punching the frame, I layered it on a Cherry Cobbler mat I had made a couple of weeks ago. (The day I spent making those mats was well worth it!) I used a dimensional to adhere the snowflake (cut from a retired Sizzix die) and added a little rhinestone to complete the card. The Cherry and White square on the card to the right is one of 12 squares on a sheet of the DSP paper. I stamped the sentiment on that square but the cute little hedgehog and stockings were all ready imprinted on the paper. The polka dot embossed white cardstock and Cherry Cobbler seam binding makes this a card that you could send to anyone you care about--saying nothing about that cute little heart on the hedgehog that completes the card. And now I have to "complete" the cleaning up of my scraproom that I started on Sunday---hahaha!!! Have a wonderful day.
Tuesday, October 23, 2012
 During Sunday's Cricut afternoon, Nikki and I were playing with the Artiste cartridge and one of the things we made was a cute hot air balloon card. Yesterday I continued playing with the cartridge and wondered how small I could cut the hot air balloon. I then used those diecuts for this card. The cardstock and ink are SU products as is the "wishing you" sentiment. The "nothing but blue skies" sentiment and the pattern paper is Close To My Heart. In case you wonder how to make the clouds/sky, it is pretty easy. Tear a piece of cardstock and along the torn edge lightly sponge off the torn cardstock onto the Whisper White cardstock while randomly moving the torn cardstock. I used one color of ink, but you can use multiple colors for a very dramatic look. By the way, the smallest balloon on this card is one inch. I tried cutting the hot air balloon smaller, but the paper was not cutting cleanly and the basket was merely a speck in the sky. Have a great day!
Monday, October 22, 2012
 This weekend was truly a "crafting weekend". Between card class on Saturday and Cricut Sunday, a lot of card stock and paper was transformed into pretty cards, ornaments and scrapbook layouts. Nikki and I spent time playing with the Artiste cartridge, one of the best Cricut cartridges I own. I even found time to make these clean and simple cards using a heart framelit, the Love You stamp from the Seasonal Sayings set and Rose Red seam binding for today's post. Have a wonderful day!
Friday, October 19, 2012
Clearance Rack Items
There are some great new Clearance Rack items. For Example:
- Crimper (which we no longer carry and I use often);
- Itty Bitty Box and Envelope Die;
- Ribbons;
- Magnetic Sheets (I use in cases to store my Framelits).
In Color Bundle
 I have been playing with various items that are in the Holiday mini and I have created some pretty card sets as gifts. As I was making cards using the 2011/2013 In Color DSP stack, I wondered how many cards one can make with the amount of DSP in the stack. Well, I can layer a minimum of 160 cards (4 1/4 x 5 1/2) with plenty of excess. And if I cut all the DSP pieces at 4 x 5 1/4, I can layer 240 cards!!!! (And still have leftovers.) So this is what I am thinking: an "In Color Bundle" which would include:
- In Color Card Stack & Pad Kit (pg. 152) $29.95 (20 sheets of cardstock and five In Color ink pads)
- Medium White Envelopes (pg. 160) $ 6.50
- Made for You Stamp Set (pg. 44) wood: $11.95 or Clear $8.95
- 10 sheets DSP: 1 each of 2 double-sided designs in the 5 In Colors (NOTE: I will trim the 12x12 DSP down to 8 1/2 x 11.) $5.50
The cards pictured in this post are just an example of the simple, yet pretty cards that can be created for your use or as gifts for someone else. As a matter of fact, this bundle might be a perfect gift for a stamper you know. The cards can be embellished with embossing folders, ribbons, brads or little stamped flowers or images you already have in your collection, just as I have done by adding a couple of butterflies and using an embossing folder. Let me know if you have any questions about this "bundle".
Wednesday, October 17, 2012
Festival of Prints Part 2

 Here are four more cards created with the Festival of Prints DSP stack. Whereas Tuesday's post consisted of Christmas cards, today's cards are birthday and get well cards, each stamped with one of the stamps from the Word Play set. I really like the diagonally stripped DSP with the color combination of Island Indigo, Vanilla and Early Espresso for the birthday cards. The Espresso background on the one card was diagonally scored numerous times using the Simply Scored tool from SU. And aren't the get well cards pretty? I cut the sheet of DSP in half and then using punches added a little dimension to the cards. Even though Bashful Blue is not listed as a color in the DSP stack, I feel that in this particular print, the blue is very close to Bashful Blue. Don't overlook the Festival of Prints DSP stack. The possibilities are endless and you can make a minimum of 48 cards. A "Festival of Prints Card Kit" keeps running through my mind: cardstock, stamp, ink pads, envelopes. I have to work on putting something like that together. Have a great day and find yourself a little stampin' time.
Tuesday, October 16, 2012
Festival of Prints DSP Stack

 Today's post includes photos of Christmas cards made using paper from the Festival of Prints Designer Series Paper stack on page 20 of the Holiday Mini. Each sheet in the paper stack measures 4 1/2 x 6 1/2 and is double-sided. The stamp used on all cards pictured here is from the Word Play set and can be purchased individually for a limited time. The cards on the left were created using one sheet of paper each card using reverse sides of the paper. After stamping the sentiment and using the decorative layer punch, I layered that onto a coordinating cardstock diecut I had cut on my Cricut. Again, a single sheet of DSP from the stack was used for the two cards on the right, using the same pattern on both. For these cards I stamped the image on rectangular pieces of Very Vanilla which meant no punch or diecuts were needed. Check back tomorrow as I will post birthday cards created with paper from the same DSP stack. In the meantime, have a great day!
Monday, October 15, 2012
Serene Fall Trees
The images on today's cards were stamped using the direct-to-rubber technique. Starting with the lightest color (More Mustard) I used my Stampin' Up markers to ink the images. I added ink to different areas blending the colors into each other. I do think that this tree image from the Serene Silhouettes set was made for this technique. Each time I inked up the image and stamped, the image was different. I used a combination of colors, mostly from the Regals collection and I must say, the cards are much prettier in person than they are showing up on my computer. No kidding--I have taken about 20 photos and none is really capturing the pretty shading of colors in the trees. I am even saying that the Bravo Burgundy card on the left is pretty and I do not care for Bravo Burgundy in the least--lol! One tip if you are doing this technique: once the stamp is inked up, then give it a good huff to remoisten the ink. Have a wonderful day!


Friday, October 12, 2012
Seaside Shack

Thursday, October 11, 2012
Clean, Simple and . . .

 pretty, too! I did not have a card to post for today, so as I was drinking my coffee this morning I was creating something "clean and simple" in my mind. I remembered that the Word Play set has a very nice Christmas stamp in it and my idea grew from there. The Raspberry Ripple card truly is clean and simple. The Midnight Muse is, too, but I stepped it up a bit by using the corner punch. The coordinating ribbon adds just the right finishing touch. An added extra for me was that my ribbon was free (last month's special)! If you are looking to create your own Christmas cards, keep in mind that clean and simple can be just as pretty as many layers and embellishments. And remember, too, that you can purchase this "single" clear mount stamp that I used from Word Play rather than the entire set with SU's limited-time offer. Have a wonderful day!
Wednesday, October 10, 2012
FYI: Stampin' Up October Bundle Special

Set of Christmas Cards

 I was given pretty Christmas scrapbook paper which perfectly matches Stampin' Up's retired Poppy Parade cardstock and ink. I made a set of cute Christmas cards with that paper together with Poppy Parade, Lucky Limeade, Bashful Blue and White cardstock and ink. The image/sentiment stamp on the front of all five cards is the Merry Christmas stamp from the For the Birds stamp set which is in the main catalog. By the way, the stamp barely fits on a Decorative Label punch, so I used the Sure Cuts A Lot labels that I made a few weeks back. (Just want you to know so that if you stamp this sentiment/image and plan to punch it out with the Decorative Label punch you won't wonder why mine fit and yours just makes it--barely!). With each card, I would say to myself, "Now that's cute" or "I really like this one"~~lol! Actually, the cards are all cute and I would be very happy to receive any one of them. As you can see, once packaged (with matching envelopes) and tied with a ribbon, the cards make for a pretty gift. I think I feel a class coming on~~anyone interested? Have a great day!
Tuesday, October 9, 2012
Halloween Favors
 I had lunch with my friend, Regina, the other day and she gave me a cute little Halloween favor. That favor inspired me to create something similar and is quite easy to make. You will need a 12"x3" piece of cardstock:
- Score at 4 1/4, 5 1/4, 6 1/4 and 10 1/2.
- Burnish and fold the score lines making a valley, hill, valley which will be the bottom of the favor and trim the 1 1/2" section of cardstock with decorative edge scissors or a punch.
- I made the eyes, nose and mouth using the Artiste Cricut cartridge, although you can use black cardstock and a pair of scissors to make the face elements in whatever shapes you desire.
 After adding the face pieces to the front of the favor, adhere the little individual packets of M&M's using double-sided tape to the inside.
- Fold the flap over, punch holes, add ribbon and there you have it!

I imagine you could use white cardstock and make this favor ghost-like or green and make it Frankenstein-like. I used mini packs of M&Ms, but you can use the mini individual packs of Skittles, candy corn, etc. So many possibilities! Have a great day and find yourself a little stampin' time.
Monday, October 8, 2012
Hershey Bar Snowmen
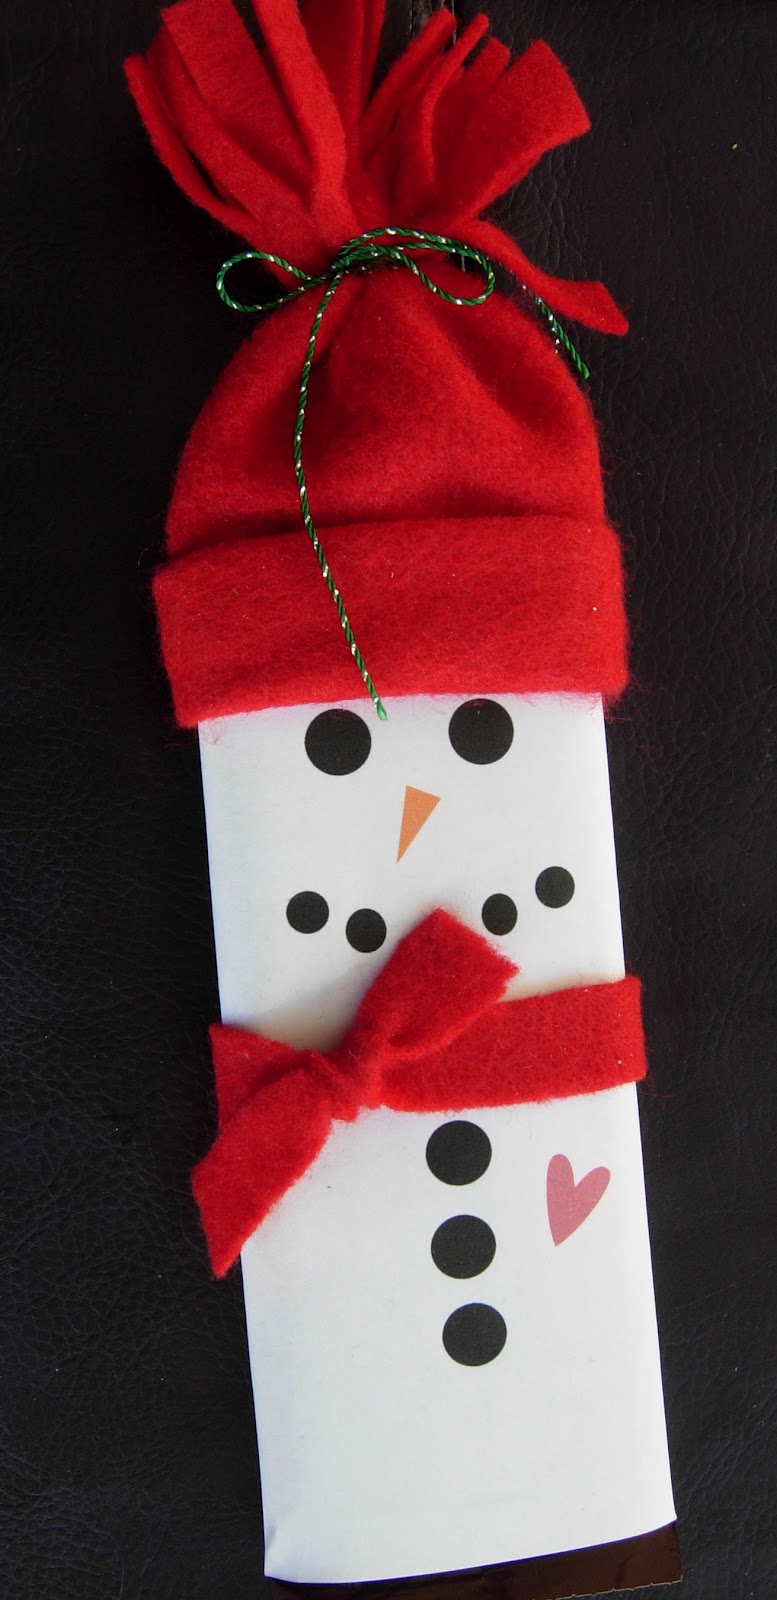
 Happy Monday! It was a little chilly here over the weekend and I actually turned on the heat to take the chill out of the air when I woke up Saturday morning. Today's post is a cute project that I first saw on the internet. I punched out little black circles and a tiny carrot nose and glued them to the white cardstock that was wrapped around the candy bar. I made the black hat from a small piece (5 1/2 x 6) of felt. As I am gluing the little circles, I decided to see if I could make a template using My Digital Studio software. I was successful and the little snowman wearing the red hat was printed on white paper. (I now have to figure out how to center the template on a piece of paper so that paper trimming is not necessary!) The red hat was made from a piece of felt that I purchased at Michael's~~an individual piece of felt that measures approximately 8 x 10 or something like that and from which you can get at least two little hats. By the way, I did have to brush the dust off my sewing machine to sew a seam for the hat. Have a great day!
Friday, October 5, 2012
Baby Stars
 Stampin' Up offers a good variety of stamp sets for the Christmas/Holiday season. I don't normally purchase many seasonal stamps, but this year I did purchase the Merry Minis set~~mainly because I thought the little matching punches were so cute. As I was looking at cards created and posted by other demonstrators I came across a Christmas card but when I saw it I thought "baby card"! Needless to say, when I had a little time I used a star from the Merry Minis set together with a sentiment from the A Word For You stamp set to create this cute baby card. I did emboss the bottom section of the card with a Sizzix embossing folder~~not a SU product. I used Marina Mist ink and cardstock as the accent color. The "string" was created using a ruler and the fine tip of the SU markers, while the horizontal score lines were created using my simply Scored tool. Have a wonderful day and a great weekend.
 Thursday, October 4, 2012
Embossed Glassine Bags


Wednesday, October 3, 2012
Crumbled Cardstock

Tuesday, October 2, 2012
Single Stamps
Stampin' Up is trying out something new! For a limmited time, we have the chance to buy single pieces from these select stamp sets: Word Play, Perfectly Penned, and Seasonal Sayings. The offer will be available now through January 2, 2013. A few details:
- These won't be sent to you in our typical cases or packaging; they'll be packaged in cello bags. If you'd like a case for your stamp, you can buy our Clear-Mount Stamp Cases that come in packs of four (item 119105).
- This offer is available for clear-mount stamps only.
- The stamps won't come with a Clear-Mount Block, and you'll need to buy a block separately if you don't already have one. The recommended block sizes can be found on the flyers.
- There's no limit on how many pieces you can buy.
Single Stamps: Word Play
Single Stamps: Perfectly Penned
Single Stamps: Seasonal Sayings
Hopefully the above links will work so that you can see the flyers for each stamp set together with images and prices. As always, any questions~~just ask.
Autumn Brilliance

 I know that when Fall arrives, I talk about the beautiful colors of the season. So today I am attempting to share that beauty thru these two photos. The scene to the right is what I see in the distance from my kitchen windows. The sun was starting to go down and was so brightly reflected on the yellow bush in the center, that I had to get a photo of it. Looking at it the photo you can see that, but if you click on the photo and it enlarges you will see the brilliance and beauty I tried to capture. The photo of the pumpkin was taken when John took Sydney for a little walk in the pumpkin field that a neighboring farmer planted. The orange of the pumpkin really is this bright and dense--no color enhancing of the photo, although the photo was cropped. So for as much as I admire today's photos, the good thing is that the view from my kitchen will be even more brilliant and colorful in a week or so--thank you, God! Living in the Midwest definitely has its advantages. I just need to remind myself of that when it is winter with the trees covered in snow and the temperature is -10 degrees--LOL!!! Have a great day and enjoy nature's colors in your area.
Monday, October 1, 2012
Teacher Gift
 As I placed an online order with my Tastefully Simple consultant, , I was remebering my introduction to Tastefully Simple. I was a preschol teacher and as such we always received ornaments, flowers, candy--a variety of really cute things, many of which I still have. More often than not, the gift usually had something to do with apples. One year I received a white frosted bag and inside was a cake mix and two apples. It was Nana's Apple Cake Mix and the two apples needed to make the cake--very cute! One morning I added the chopped apples and the two eggs it called for, baked it and tasted Nana's Apple Cake The "very cute" became a "very cute and very good, too" and more than 12 years later, I still think it is a great product. So if you are wondering what to get a teacher in your child's life, hop over to Kelly's website, www.tastefullysimple.com/web/kkaczanko and check out Nana's Apple Cake Mix. I highly recommend this product, along with just about everything I have purchased from TS. And don't forget about the presentation! Here is a cute little bag I stamped using the No Peeking and Jolly Bingo Bits stamp sets with matching tissue, too! Have a wonderful day!
Subscribe to:
Posts (Atom)
-
 So how cute is this little candy purse? A while ago I had seen something similar, but this is the first chance I had to make one myself. On...
 -
 Today's most important message is "Happy Birthday, Sydney"! We truly are blessed with a beautiful granddaughter. The stamp s...
 -
 Many of you know that I have a tremor and recently it has gotten worse. My handwriting is awful and coloring is getting harder and frustra...